Out of the box, Odoo covers an impressive amount of ground, including sales, inventory, accounting, CRM, websites, manufacturing, and more. But no two businesses run exactly alike, and that gap between “how Odoo works” and “how your business works” is where custom modules come in. Odoo customization lets you extend the platform with your own fields, workflows, and apps rather than forcing your team to adapt to generic software.
In this step-by-step guide, we’ll walk through building a custom Odoo module from an empty folder to a working app, share best practices we follow as an Odoo customization services-providing company, and answer the questions developers and business owners ask most often.
What Is a Custom Odoo Module?
An Odoo module (also called an add-on) is a self-contained package of Python code, XML views, security rules, and data files that adds or modifies functionality in Odoo. Everything in Odoo, from CRM to Accounting, is itself a module, which is exactly why Odoo ERP customization is so powerful: you extend the system using the same framework Odoo’s own apps are built on.
Custom modules typically do one of three things:
- Extend existing apps: You can add fields, buttons, automations, or reports to modules like Sales or Inventory (for example, Odoo CRM customization to match your sales pipeline).
- Build new apps: Create entirely new models and menus for processes Odoo doesn’t cover, like fleet routing or industry-specific compliance.
- Customize the front end: Odoo website customization, portal changes, and custom themes for customer-facing pages.
Why Businesses Invest in Odoo ERP Customization
Standard configuration and Odoo Studio get you far; code-level customization becomes worthwhile when you need complex business logic, external integrations, performance at scale, or upgrade-safe changes that survive version migrations. Companies that invest in professional Odoo ERP customization services typically see faster user adoption, fewer spreadsheets living outside the ERP, and reporting that actually reflects the business.
If you’re still deciding which Odoo version to build on, our Odoo 19 guide with a complete module overview covers what’s new, including AI agents, dark mode, and major performance improvements.
Prerequisites: What You Need Before You Start
- Python 3.10+ and PostgreSQL installed locally.
- Odoo source code (Community or Enterprise); clone it from the official Odoo GitHub repository
- A code editor (VS Code with Python extensions works well)
- Basic knowledge of Python, XML, and relational databases
- A dedicated add-ons directory for your custom modules, kept separate from Odoo core
Run Odoo in developer mode (Settings → Activate Developer Mode) so you can inspect fields, views, and models while you work.
Step-by-Step: Building Your First Custom Odoo Module
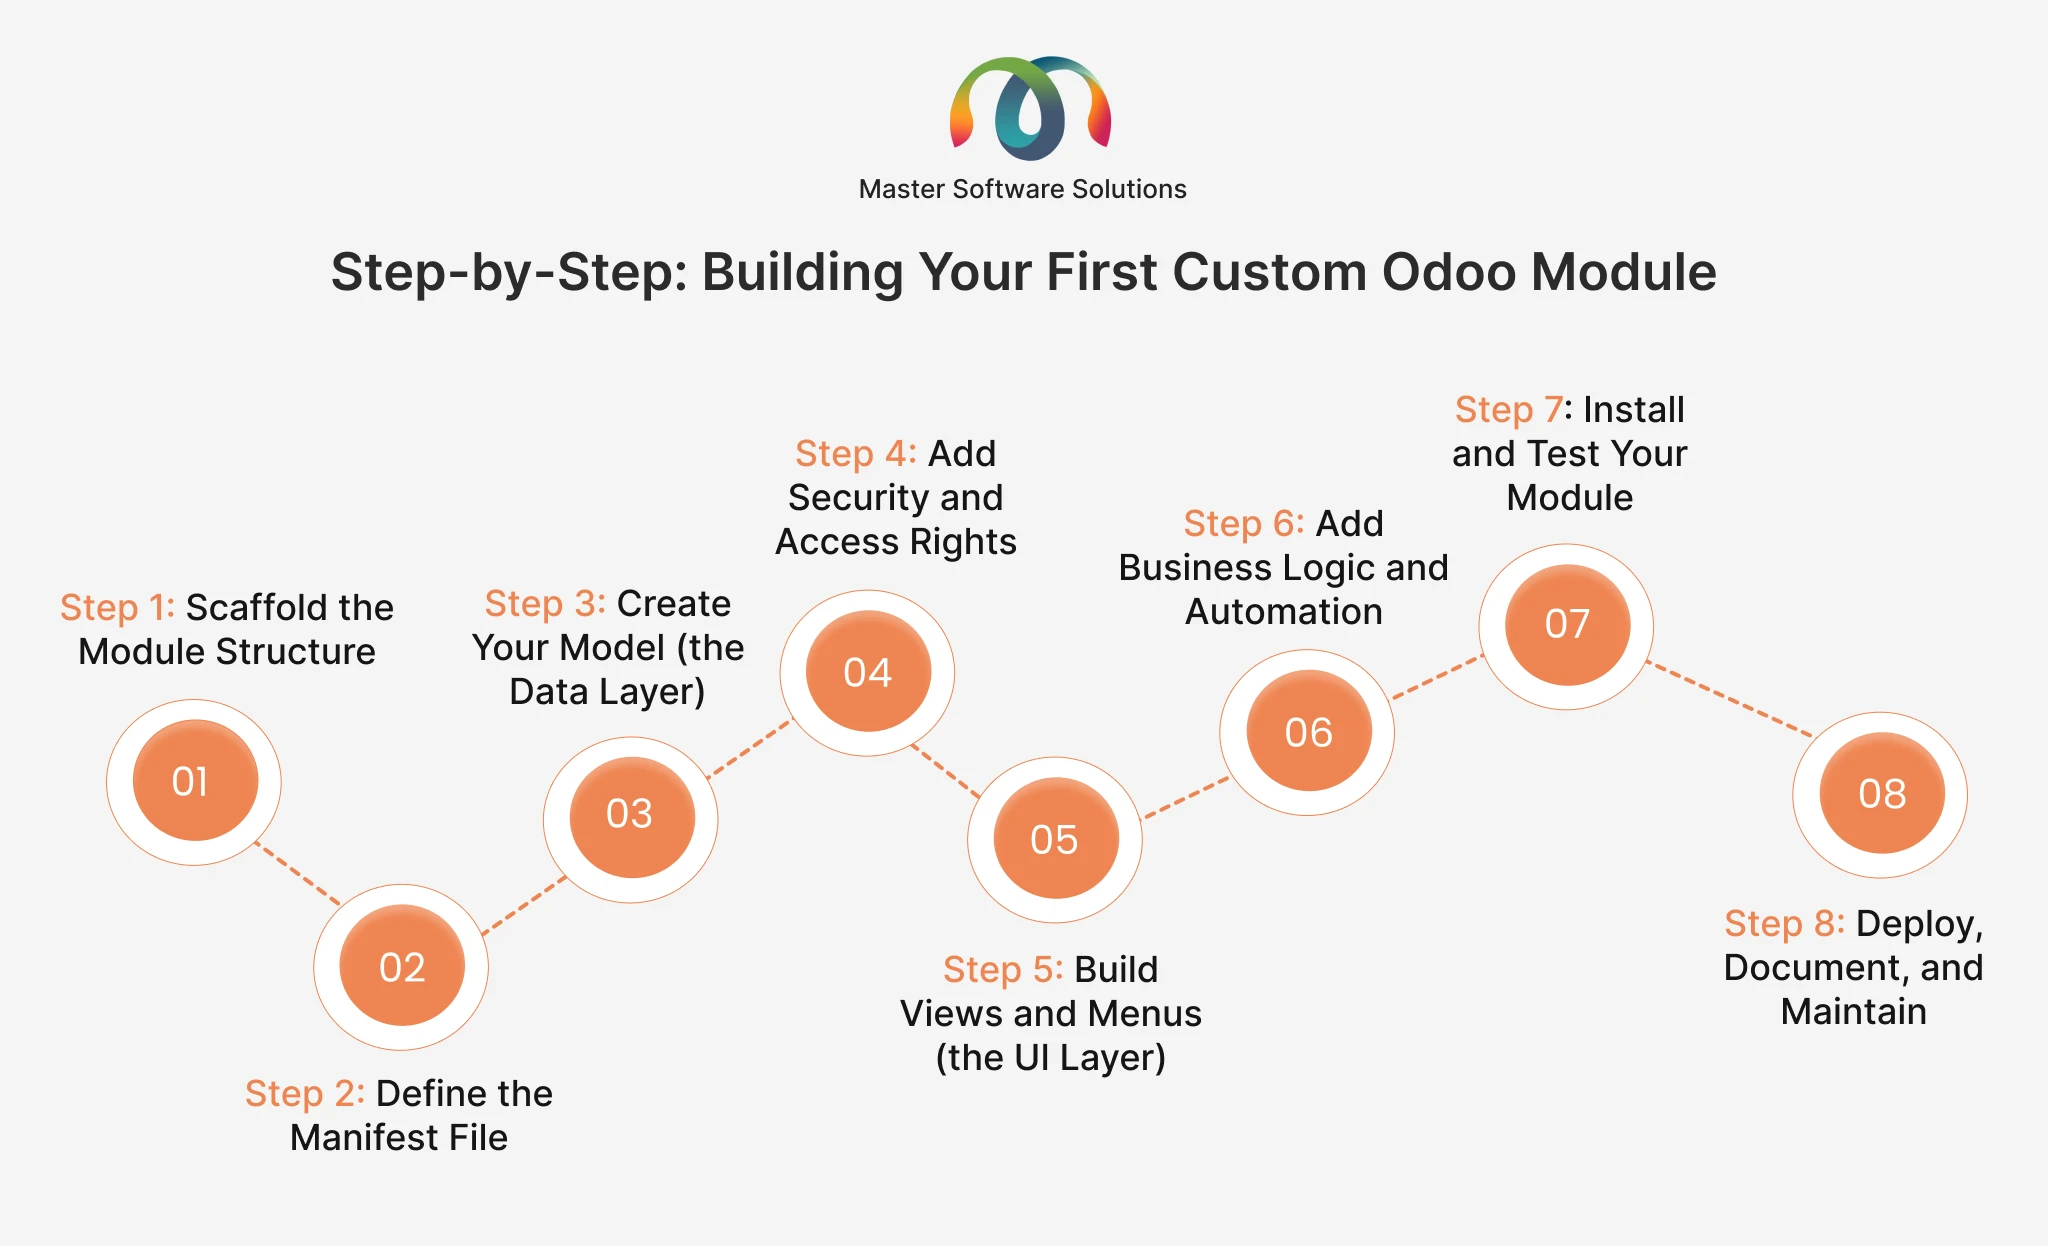
Step 1: Scaffold the Module Structure
Odoo ships with a scaffolding command that generates a clean skeleton:
python odoo-bin scaffold my_module /path/to/custom-addonsA well-organized module looks like this:
my_module/
├── __init__.py
├── __manifest__.py
├── models/
│   ├── __init__.py
│   └── my_model.py
├── views/
│   └── my_model_views.xml
├── security/
│   └── ir.model.access.csv
├── data/
└── static/
Step 2: Define the Manifest File
The __manifest__.py file is your module’s identity card. Odoo reads it to know the module’s name, version, dependencies, and which data files to load:
{
    'name': 'Property Manager',
    'version': '19.0.1.0.0',
    'category': 'Real Estate',
    'summary': 'Manage property listings and offers',
    'depends': ['base', 'mail'],
    'data': [
        'security/ir.model.access.csv',
        'views/my_model_views.xml',
    ],
    'installable': True,
    'application': True,
    'license': 'LGPL-3',
}
Declare every module you inherit from in dependencies; missing dependencies are one of the most common causes of installation errors.
Step 3: Create Your Model (the Data Layer)
Models are Python classes that map to PostgreSQL tables through Odoo’s ORM. Here’s a simple example:
from odoo import api, fields, models


class Property(models.Model):
    _name = 'property.property'
    _description = 'Property Listing'
    _inherit = ['mail.thread']

    name = fields.Char(required=True, tracking=True)
    price = fields.Float()
    state = fields.Selection([
        ('new', 'New'), ('sold', 'Sold')],
        default='new')
    total_offers = fields.Integer(
        compute='_compute_total_offers')

    @api.depends('offer_ids')
    def _compute_total_offers(self):
        for record in self:
            record.total_offers = len(record.offer_ids)
To modify an existing model instead of creating a new one, the heart of most Odoo customization work, use _inherit with the existing model name, such as res.partner or crm.lead, and add only your new fields and methods.
Step 4: Add Security and Access Rights
No one can see your model until you grant access. At minimum, create security/ir.model.access.csv:
id, name, model_id:id, group_id:id, perm_read, perm_write, perm_create, perm_unlink
access_property_user, property.user, model_property_property, base.group_user, 1, 1, 1, 0
For row-level control (for instance, salespeople seeing only their own records), add record rules. Skipping security is the number one mistake in DIY Odoo ERP customization: modules that work for the admin user but fail for everyone else.
Step 5: Build Views and Menus (the UI Layer)
Views are defined in XML. You’ll typically create a list view, a form view, an action, and a menu item:
<odoo>
  <record id="property_view_list" model="ir.ui.view">
    <field name="name">property.list</field>
    <field name="model">property.property</field>
    <field name="arch" type="xml">
      <list>
        <field name="name"/>
        <field name="price"/>
        <field name="state"/>
      </list>
    </field>
  </record>

  <record id="property_action" model="ir.actions.act_window">
    <field name="name">Properties</field>
    <field name="res_model">property.property</field>
    <field name="view_mode">list,form</field>
  </record>

  <menuitem id="property_menu_root" name="Properties"
            action="property_action"/>
</odoo>
To change existing screens rather than build new ones, use view inheritance with XPath expressions, the upgrade-safe way to add a field to the CRM pipeline form or reorganize the sales order screen.
Step 6: Add Business Logic and Automation
This is where customization earns its keep: compute fields, onchange methods, constraints, scheduled actions (cron jobs), and email automations. Keep business logic in models, not views, and write it defensively, because your methods will run on batches of records, not just one.
Step 7: Install and Test Your Module
Restart Odoo with your addons path and update the apps list:
python odoo-bin -d mydb --addons-path=addons,/path/to/custom-addons -u my_moduleThen test like a user, not a developer: log in as a non-admin, walk through the full workflow, and check access rights. For anything going to production, add automated tests using Odoo’s built-in testing framework. The official Odoo developer tutorial is an excellent companion reference for each of these steps.
Step 8: Deploy, Document, and Maintain
Version-control your module in Git, deploy through a staging environment first, and document what you built and why. Every Odoo version upgrade (roughly annual) will require reviewing your customizations; clean, well-structured modules migrate in hours; tangled ones take weeks.
Need it done right the first time? Master Software Solutions builds upgrade-safe custom modules for companies worldwide. Explore our Odoo module development services based on your requirements.
Best Practices for Odoo Customization That Survives Upgrades
- Never modify Odoo core code: You can extend it through inheritance, so upgrades don’t wipe out your work.
- One module, one purpose: Small, focused modules are easier to test, debug, and migrate.
- Follow Odoo’s naming and structure conventions: Future developers (including you) will thank you.
- Add security from day one: Access rights and record rules are much harder to retrofit.
- Test with real data volumes: Logic that works on 10 records can crawl on 100,000.
- Plan for the next version: Odoo releases annually; build with migration in mind.
Odoo Studio vs. Custom Module Development: Which Do You Need?
Odoo Studio (Enterprise) lets non-developers add fields and tweak views with drag-and-drop, which is great for quick, simple changes. Custom module development is the better path when you need complex logic, third-party integrations, custom portals, Odoo website customization, or changes you can cleanly version-control and migrate.
Many businesses use both: Studio for cosmetic tweaks and custom modules for anything mission critical. A good rule of thumb: if a change affects money, inventory accuracy, or customer data, put it in the appropriate module.
When to Bring in an Odoo Customization Partner
Building one module is a great learning project. Building, securing, integrating, and maintaining a customized ERP that your whole company depends on is a different scale of work.
Consider professional Odoo customization services when:
- Your customizations touch financials, inventory valuation, or compliance
- You need integrations with payment gateways, shippers, marketplaces, or legacy systems
- An upcoming version upgrade has to carry years of customizations forward safely
- You need Odoo CRM customization or Odoo website customization aligned with revenue workflows
- Internal IT doesn’t have dedicated Odoo framework experience
As an experienced Odoo customization partner in the USA and beyond, Master Software Solutions has delivered Odoo ERP customization services across manufacturing, distribution, retail, and delivery businesses, from single-module tweaks to full implementations. If you’d rather scale your own team, you can also hire dedicated Odoo developers on flexible engagement models.